SatNOGS

IPv6 prefix delegation and subnetting

Subnetting is one of the tools you can use as part of segmenting a LAN in e.g a DMZ, a subnet for IoT devices etc. In this note I’ll explain how I did it in IPv6 using Prefix Delegation.

I took this opportunity to learn more about it. I set up the following test network using VirtualBox: (main router is a real host that runs Gentoo; the virtual hosts (Net0,1,2,…) live on my workstation and run ArchLinux or Debian)
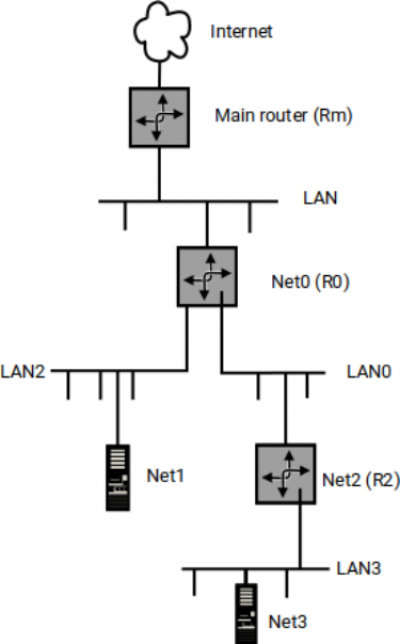
My ISP has given me a /48 delegation as per RIPE recommendation. I want to subdivide this so that the first level subnets attached to my LAN (‘LAN’ on the picture) get a /56 delegation. This means that up to 2^8 or 256 subnets could be attached to my LAN. Subnets created under such a /56 subnet (e.g. LAN0) will get /60 delegated. In other words each first level subnet can support up to 2^4 or 16 second level subnets.

My initial intention was to do all of it using systemd-networkd only, but I very quickly found out that this was not possible with the present (July 2022) version of systemd (251.2). Networkd (as I’ll call systemd-networkd in the following) has both a DHCP server and a DHCP client for IPv4 but only a DHCP client for IPv6. So I used ISC’s dhcp package as DHCP server for IPv6.

In the following I’ll treat the routers one by one and highlight what is essential to get this router to work the way I want it.

Main router (Rm)

The main router is a physical host. Its network interfaces are all configured using networkd. It provides DHCP service to the LAN and forwards requests from the Internet to the appropriate servers on the LAN.

It receives a /48 prefix from the ISP and is configured to delegate /56 prefixes to requesting routers on the LAN if so asked. The DHCP6 server is configured to delegate prefixes in the range 1 to f (2001:2db:8073:0100::/56 to 2001:2db:8073:0f00::/56).

This router does not use networkd’s DHCPv4 server as that server cannot serve static IPv4 addresses. The hosts on the LAN are all (except the DHCP server itself) configured with DHCP, so the ability to assign static addresses is a must. Hence the DHCP server from ISC is used in IPv4 mode too.

Details and the configuration files are here: Main Router

Net0 (R0)

This router is attached to the LAN and thus gets a /56 allocation (2001:2db:8073:e00::/56) from the main router. It serves prefixes and IP addresses to LAN0. The prefixes are served by the DHCPv6 server and IPv4 addresses are served by networkd (as static addresses are not required in the test network.)

The configuration files are here: R0 config

Net2 (R2)

It gets a /60 prefix from R0 (2001:2db:8073:e80::/60).

The configuration files are here: R2 config

Net3

This host is ‘just’ a host on LAN3. Using SLAAC it gets an IPv6 address like 2001:2db:8073:e80:a00:27ff:fed5:e9ee/64 derived from the RA.

Its configuration files are here Net3 config

Views: 160

Lessons learned so far

After I got a Wimo AT-1 turnstile installed in my tower I decided to set up a SatNOGS ground station using a RTL-SDR dongle as receiver on a Raspberry Pi 3B.

Using the SAtNOGS image for RPi has not taught me much, but I have let it being used by the community. This will probably continue this way for quite some time until I pull myself together and dive into DSP and GNU Radio.

Using an RPi as server as I do here is a mixed blessing. Although the RPi is cheap and easy to get up and running it appears that it is not quite suited as a server running continuously.

After some time (which can be days and weeks) the CPU apparently looses contact to the micro-SD card that acts as hard disk. It can still be ping’ed but you cannot log into it.

I have been told that it may be due to the way the internal file system on the card works. In any case the card becomes totally unaccesible and has to be replaced by a new card.

I have tried to amend the situation by adding an external hard disk to the RPi but it only took longer before the situation appeared again 🙁

Views: 90

SatNOGS’ image for the Raspberry Pi 3

Since I got nowhere with neither pip nor git I turned to the ‘official’ Raspberry Pi image. It contained a ready-to-run setup of all the SatNOGS software, so I got a chance to find out how to configure it.

First of all there was a setup program (which uses Ansible) so I could supply the necessary information to the program. Using the setup program I got the following in /etc/default/satnogs-client:

ATNOGS_API_TOKEN="<---obfuscated--->"
SATNOGS_NETWORK_API_URL="https://network-dev.satnogs.org/api/"
SATNOGS_RX_DEVICE="ic821h" 
SATNOGS_STATION_ELEV="37" 
SATNOGS_STATION_ID="187" 
SATNOGS_STATION_LAT="55.83904" 
SATNOGS_STATION_LON="12.39592"

The tricky part here was the Station ID. It is not the callsign of your station – which to me would be the natural interpretation – but the serial number you get when you register your station at the SatNOGS web site.

Finding the code that actually comprises the client was more difficult but I found it in /var/lib/satnogs/lib/python2.7/site-packages/satnogsclient/ Here was also the settings.py file. The part of it concerning the whereabouts of the ground station is:

import os
from distutils.util import strtobool
from os import environ, path

def _cast_or_none(func, value):
try:
  return func(value)
except (ValueError, TypeError):
  return None

# Ground station information
SATNOGS_API_TOKEN = environ.get('SATNOGS_API_TOKEN', None)
SATNOGS_PRE_OBSERVATION_SCRIPT = environ.get('SATNOGS_PRE_OBSERVATION_SCRIPT', None)
SATNOGS_POST_OBSERVATION_SCRIPT = environ.get('SATNOGS_POST_OBSERVATION_SCRIPT', None)
SATNOGS_STATION_ID = _cast_or_none(int, environ.get('SATNOGS_STATION_ID', None))
SATNOGS_STATION_LAT = _cast_or_none(float, environ.get('SATNOGS_STATION_LAT', None))
SATNOGS_STATION_LON = _cast_or_none(float, environ.get('SATNOGS_STATION_LON', None))
SATNOGS_STATION_ELEV = _cast_or_none(float, environ.get('SATNOGS_STATION_ELEV', None))

So the information is taken from environment variables as I suspected, but who sets the up and how? It turned out that SatNOGS relies heavily on the functionality of systemd, but the service script for the client reveals how:

[Unit]
Description=SatNOGS client
Requires=redis-server.service
After=redis-server.service

[Service]
EnvironmentFile=-/etc/default/satnogs-client
Environment=LD_PRELOAD=/usr/lib/arm-linux-gnueabihf/libuhd.so.003
ExecStart=/var/lib/satnogs/bin/satnogs-client
#Restart=on-failure
User=satnogs
Group=satnogs

[Install]
WantedBy=multi-user.target

Keine Hexerei, nur Behändigkeit

Views: 56

Getting satnogs-client with git

Getting the client with git is quite simple. I went to /usr/local/source and executed the following command:

git clone https://gitlab.com/librespacefoundation/satnogs/satnogs-client.git

The code revealed (in scheduler/tasks.py) that it took information on e.g. the location of the ground station from a file called settings – probably even settings.py. And lo and behold: in the root of the tree there was a settings.py. Inspection of that file revealed the the definition of the variables was taken from  some environment variables, but who defines those variables?

Views: 55

Getting satnogs-client using pip.

Pip has a package containing the client. You get it with this command

pip install satnogsclient

When you run the installed program, it aborts immediately with this error message:

Exception: SATNOGS_STATION_ID not configured.

so quite clearly some configuration is required, but how? There were no obvious hints neither in the code nor on the SatNOGS web site.

Perhaps a look into the code might help. Try getting the source with git.

Views: 54

Getting satnogs-client

It appears that there are at least three ways of getting satnogs-client onto one of your compters:

  • Go to Github and read ‘README.rst’ which tell you you can either install using pip:
    pip install satnogsclient

    or

  • clone the latest development version:
    $ git clone https://gitlab.com/librespacefoundation/satnogs/satnogs-client.git
    $ cd satnogs-client
    $ pip install -e .
    
  • The reference platform for SatNOGS is the Raspbery Pi 3. so the SatNOGS wiki has a few words on the matter: SatNOGS wiki on the RaspberryPi 3

I have tried all three methods and I’ll comment on all three of them. 😉

Views: 64

SatNOGS’ Client

The client module (dubbed satnogs-client) is one of the two areas I’ll concentrate upon now.

I finally located the documentation for the module: SatNOGS Client Documentation  So away for some reading.

A few days later: I have found out that the client uses the utilities from hamlib (Hamlib wiki) in casu rigctld and rotctld. Since I have no antennas (yet) I have concentrated on learning how to use rigctld and rigctl.

Using rigctl is quite simple. My radio is an Icom 821 so after having studied the man page I could start rigctl with this command:

sudo /usr/local/bin/rigctl -m 334 -r /dev/ttyUSB0 -s 19200 -c 0x60 -vvvvv

I could talk to the 821 and e.g. see the frequency change in the display.

BTW You may as well use rigctld for this (This is what satnogs-client does, I have found out). The only difference is that instead of receiving commands from stdin rigctld reads them off a TCP socket, default 4532. Use ‘netcat’ to communicate with rigctld:

nc localhost:4532

The available commands are documented in the man page for rigctl and/or rigctld.

The next task will be to get satnogs-client up and running.

Views: 56

So what is SatNOGS?

SatNOGS stands officially for “Satellite Networked Open Ground Station” which I take to mean “Open Networked Satellite Ground Station”, but ONSGS is not a very user friendly acronym…

The SatNOGS web site satnogs.org has a wealth of information, but the page I found most useful is the wiki: wiki.satnogs.org. I’ll quote one image that gives a overall view of the whole setup:

SatNOGS block diagram

Since my primary purpose of the whole  exercise is to familiarize myself with SatNOGS rather than building an actual grundstation and since I have have no antennas at the moment I’ll restrict myself to work with the two boxes ‘SatNOGS client’ and ‘Signal Reception’ (marked in red in the picture).

I have at hand a radio (an ICOM 821) and several options for decoders: an old DSP12 TNC, a SignaLink soundcard and a standard coundcard in the my workstation. Alternatively I might acquire a SDR unit. Doing this will probably teach me a lot more about signal processing than working with the older ‘classical’ ICOM 821.

The hardware for the SatNOGS client could be either my workstation or a Raspberry Pi 3.

I consider setting up the SatNOGS client as a piece of cake (how difficult can installing a piece of software be?) so the next step will be to get the 821 back into the shack and connect the above mentioned decoders to it. Perhaps I should rig something up as a receive antenna.

Views: 72